
Interactive Writing Notebooks: Creating a "Space-Saving" Reference Section
I remember when I first started teaching upper elementary- I would have my students write on notebook paper. After writing, they would store it in a folder or turn it in to me. Writing was detached and in a way, the connection was never formed. I knew I taught writing lessons to my class, but it seemed the work produced did not align to the many in-depth skills taught! I knew I needed to do something to make writing more meaningful. I remember hearing about math, reading, science and writing journals. I ran to Target and purchased composition notebooks for my entire class. Finally! I will get the writing I want!... wrong. Although they began caring a bit more about their writing, they still were not producing the pieces I knew they were capable of writing. Then it hit me- these are kids; young children who are in their beginning stages of becoming independent writers. It wasn't solely about having a notebook; my students needed resources at their fingertips.
My students needed support. They referenced my anchor charts all of the time. However, every single chart I made for each writing lesson could not fit onto the tiny amount of wall space I had, but I knew my students needed more than just a decorative writing journal. They needed an INTERACTIVE writing notebook. I needed a way for them to have access to different writing strategies, the writing process and other elements of writing that came from my lessons. I needed to hold students accountable for taking their learning into their own hands. This is how the super-mini anchor charts came into existence in my life! I realized that if I gave them a full chart for every element of writing I taught to glue into their notebooks, they would have no room left to physically write. I needed to put a lot of writing mini=lesson information into a little amount of space: an interactive reference section.
6 Steps for setting up an interactive reference section
1. Plan It:
Think about the various and important writing skills/strategies you want your students to internalize from each of your lessons. Write down the order in which you want to introduce those skills and how in depth you want to go. Even if you do not have it all mapped out, start small and think week-to-week: What is the big idea you want your students to take away from writing?
2. Prep It:
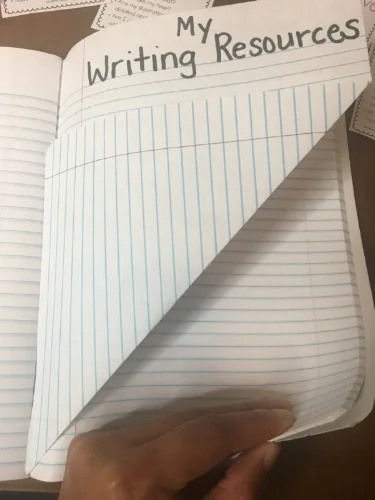
Block off 15-20 pages (this may vary depending on how many concepts you plan to give in charts and other resources) in the back of the composition notebook. You can use a paperclip or folded edge. Students will know that these pages are specifically used for reference materials. You can opt to use the front of the notebook, but I prefer to have student writing come first and reference materials housed in the back for extra support. Plus, if you have students glue charts within the notebook around their actual writing, it will be hard for them to locate a specific skill or strategy to use for future writing pieces. Here you can see how simple it is to fold an edge in the back of the notebook.
3. Model It:
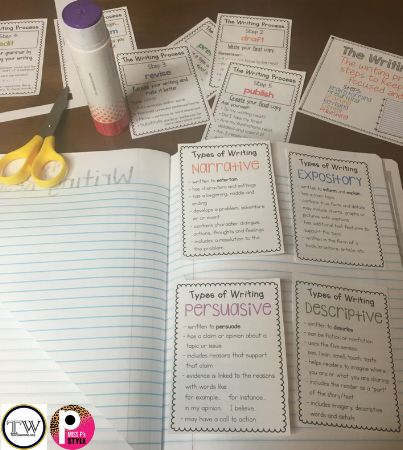
As I teach a set of writing skills, I will use an anchor chart to make the skill visual. I will then give my students a super-mini anchor chart to glue into their notebooks that match. What are super-mini anchor charts? These are charts that are smaller than the traditional full-page or half-page anchor charts. These charts are 3.5in x 2.5in in size! Four charts can fit onto one side of student notebook pages. I will show students where and how to glue them into their notebooks to ensure their charts will fit. We refer to these charts often and I model how to gain assistance from them.
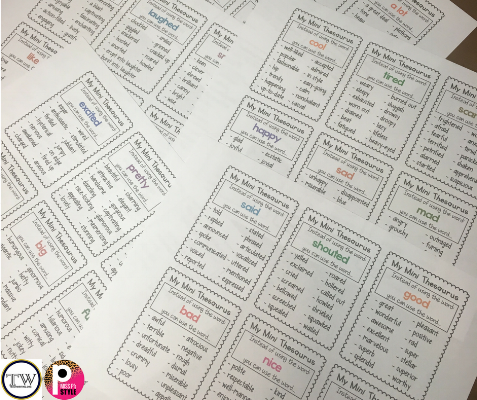
Super-Mini Anchor Charts save a TON of space in notebooks and allow for more student writing space! 6 mini charts are on a page so it will take 4 sheets of paper to provide charts to 24 students!
4. Expose It:
I will give my students plenty of opportunity to practice using the back reference sections of their notebooks. Practice occurs during mini-lessons and writing conferences. Not to mention, skills are constantly spiraled which means we practice, practice, practice. I will often refer them to specific sections and help guide them in using their resources independently: "I see you are trying to add an interesting lead to your story. Let's flip back to your anchor charts on writing hooks and try to find an option that would work best." It is all about consistent exposure and actively using their reference section.

So much content can be available for students on just a couple of pages!
5. Don't Rush It:
Slow and steady wins the race. Only add charts that you have successfully taught and feel confident that students can use them with ease. If you put all of the resources in their notebook before they know explicitly what it is, students most likely will not use it for the purpose in which it is designed.
6. Add To It:
I will add to my teacher model notebook for a good portion of the school year. It's a "growing writing notebook" that begins in the first weeks of school. Make sure you are giving as much as your most struggling student may need. There is no harm in giving your students several charts. Those who need them WILL use them. If students are no longer using them because they have internalized the skills... that is the entire goal! Great Job! These notebooks may follow students throughout the next school year just for your helpful reference section you provided them with!


Helpful Tips:
Tip 1:
I personally begin teaching the writing process and writing V.O.I.C.E.S. first. As we are working through the steps in our first pieces of writing, we begin adding the different elements to our notebooks. Then, I spend a LOT of time on revising. This would include finding more interesting word choices by using thesaurus charts, including powerful hooks and conclusions, adding figurative language, modeling showing not telling, etc.
Tip 2:
You can use any visual for student notebooks. You can easily take photos of your class-made anchor charts or really cool images, shrink them and print! That will create the same style of reference section! Snapping a clear photo of your chart and shrinking it to the desired notebook size will do the trick!
Tip 3:
Although I print in color, printing with black in on white or colored paper works just as well. When printing on colored paper, I do like to color-code the skills (example: writing process-green paper, thesaurus-pink paper, writing hooks- blue paper, conclusions- yellow paper, etc.). Color-coding skills will visually help students flip to and find sections quickly. Not to mention- you can save on ink!
TIP 4:
You can also create a few reference books for your classroom writing center. Students would grab them when they need them and return them for another student to use. These would be "growing reference notebooks" that you (or a responsible student) can add to when the time is right for new information.
Tip 5:
It is valuable to build these reference sections WITH your students. If you glue all of the pages in for students before they learn the content, they will have no idea what is available or where to look, meaning… the back reference section will not get used as designed. The goal is to create independent, confident writers!
About the Author:

Megan has lived all over the world due to military parents and has no hometown! She attended the University of Tennessee (Knoxville) and obtained her Bachelor and Master degrees in Early Childhood Education. Megan furthered her education by achieving her Education Specialist degree in Curriculum and Instruction with an emphasis in Reading, Literacy and Assessment. She started her teaching career in 2006 and has taught kindergarten, second and fourth grade before securing a role as a literacy specialist on her elementary school campus. She loves working with students (Kindergarten-5th grade), coaching teachers in reading/writing instruction and servicing students with dyslexia. Literacy is embedded into all subjects and areas of life and it's her goal to make reading/writing engaging, interactive and enjoyable! In her free time, you will find her journaling, creating curriculum or traveling to another state or country!